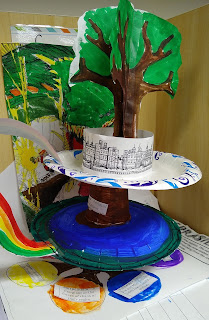
Yggdrasil - 3D Norse world tree
Using 2 paper plates, 2 paper cups and a few online templates this worked pretty well to make a 3d version of the Norse mythology world tree Yggdrasil. I used this image for reference https://i.pinimg.com/originals/90/76/b4/9076b46b396168bed1d33195a2e6977c.jpg
1) First paint one plate to have a green ring around the outisde (Jormungundur - the midgard snake who holds in the oceans on the "flat earth"). Blue water inside of that and brown in the center - land (Midgard). After it is dry, they can go over it with sharpie and make the green ring look more like a snake eating its own tail.
2) On the other plate I cut down a paper length strip of just the castle from this coloring page of Windsor castle. I wrapped it in a ring and glued one end to itself. Then folded the space under the castle out so we could tape/glue it to the plate (Asgard). https://www.justcolor.net/history/royal-kings-and-queens/?image=kings-and-queens__coloring-windsor-casle-great-britain__1
3) Paint the side of the 2 paper cups brown.
4) Cut and color a strip of paper rainbow.
5) I traced the open end of the paper cup 7 times in a circle around a 8th. Coloring each of these a different color and attaching them to the center with brown roots.
6) I gave them labels and descriptions of the different realms - which can be seen on the reference image but something similar could be found a lot of different places. The order of which doesn't matter - except Asgard and Midgard.
7) At the very top we did a double sided version of this tree template and taped the base inside the castle walls of Asgard. https://www.firstpalette.com/pdf/tree2.pdf We were even able to fold the paper in half and then the tree in half - kind of like doing Christmas snoflakes. That way we only had to cut one side of one tree with the other papers folded behind it to get 2 complete tree templates cut out.
8) To assemble we put the base of the roots, then one cup hotglued to it, Midgard hotglued above that, another cup glued above that, Asgard hot glued above that. Then taped our rainbow bridge off the side connecting to whatever realm they want. Here's a pic of how it turned out.
